How to Grow a Coffee Plant from Seed
Summary: Sprouting coffee seeds is a fun way to learn more about coffee, and the most important thing to start with is fresh coffee seeds.
First Off, Coffee Beans are Coffee Seeds
That’s right, the roasted coffee beans that we grind to make delicious cups of coffee are actually the seeds of the coffee plant. Before the coffee beans/seeds are roasted they’re known as “green coffee”, or “raw” coffee.
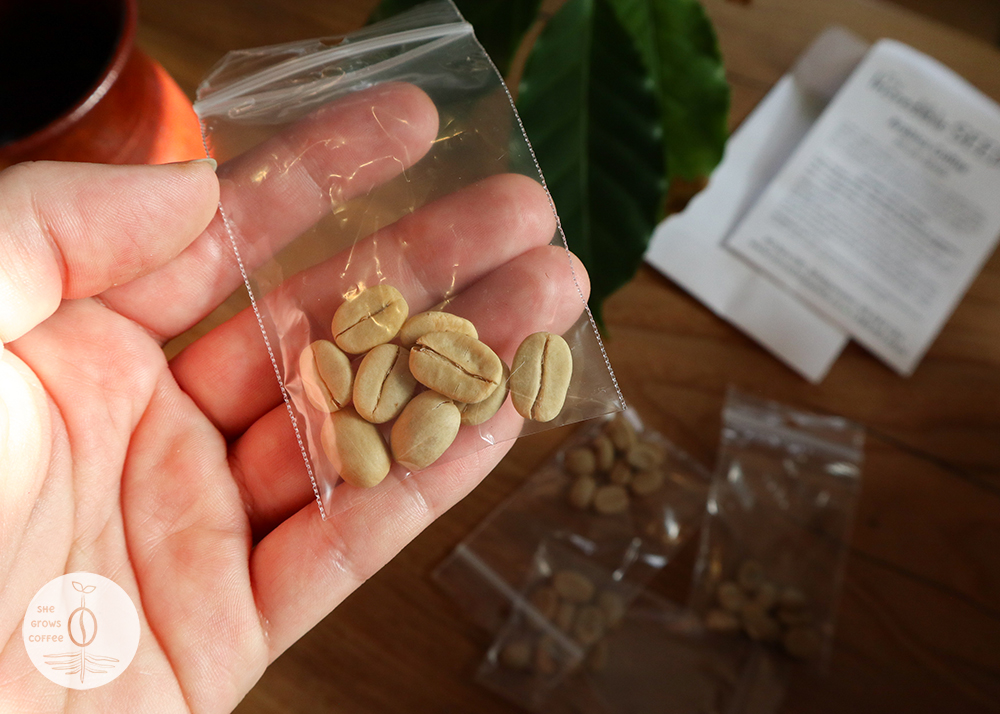
Green coffee beans are fresh coffee seeds that have been processed (dried) to make them shelf stable in order to be shipped and stored around the world without spoiling.
Sprouting Coffee Seeds Requires FRESH Seeds
It probably goes without saying, but for those who aren’t aware: you cannot grow coffee plants from roasted coffee beans. And before trying to sprout green coffee beans, it’s important to know that successful sprouting requires fresh coffee seeds.
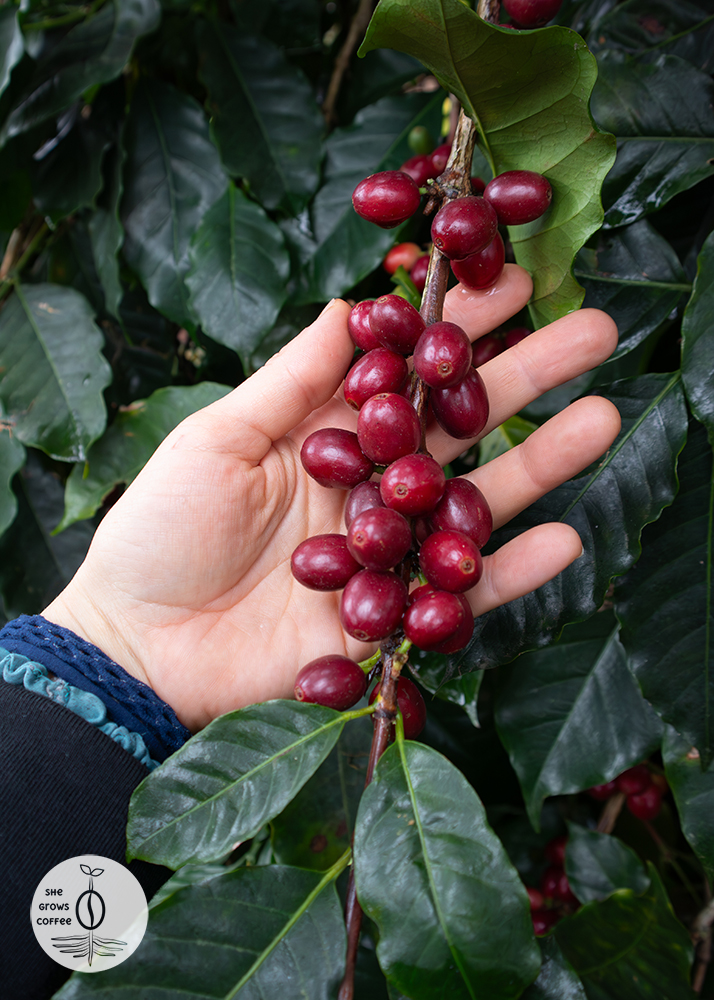
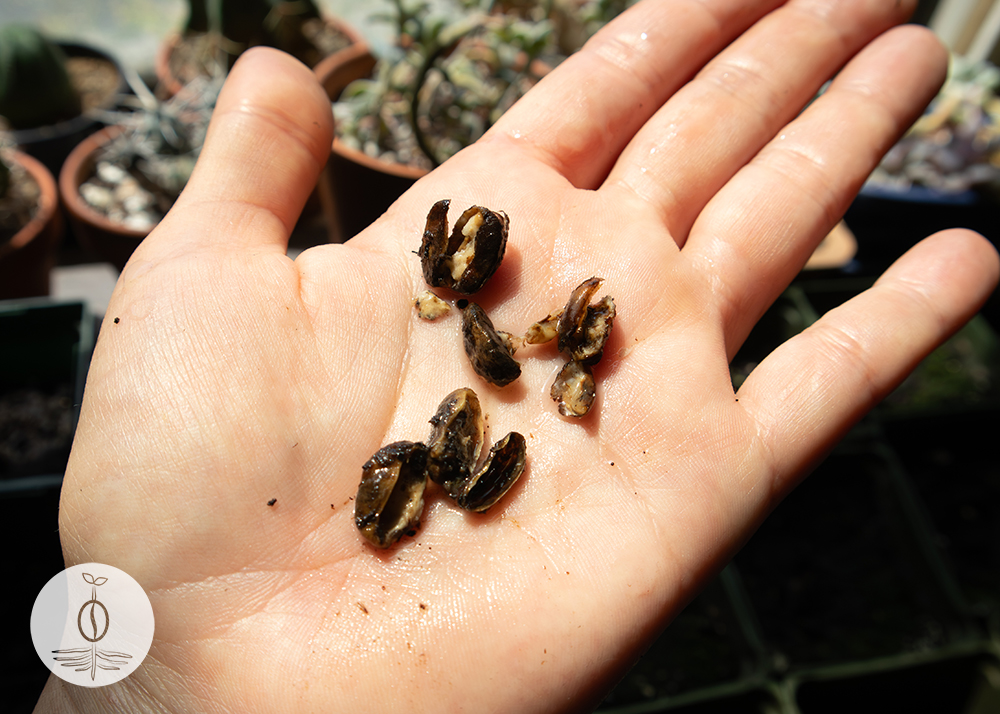
Fresh coffee seeds are found within the coffee fruits (called “cherries”) that form on coffee branches after the coffee plant flowers. Inside each coffee cherry are typically two coffee beans (seeds); with some cherries only having one bean inside (known as a “peaberry”).
It can’t be stressed enough: To ensure success with sprouting coffee seeds, the most important thing is to have fresh coffee seeds—Or even better, fresh coffee cherries.
A good amount of trial and error over the years has taught me that, while there is a small chance that a dried green coffee bean will sprout (since they do still have about a 12% moisture content), they also tend to be months old and have lost most if not all of their fertility. Fresh or “wet” coffee seeds, on the other hand, are highly fertile and have a much better chance of sprouting.
How Does One Obtain Fresh Coffee Seeds?
Locating fresh coffee seeds can be tricky depending on where in the world you are located. It is is illegal to ship fresh coffee seeds over national borders, so unless you live in a coffee-producing country or the United States, you may need to “get creative”.
If you do live in a country where coffee is grown, you can visit a farm and buy some cherries directly from a farmer. If you live in the US, especially in or near the south where coffee plants can survive (i.e California, Hawaii, and Puerto Rico), you can try researching online to see if there is anyone or any local retailers selling fresh coffee seeds.
For those of us living outside of the US and far away from coffee regions, there are two options—one of them, of course, being committing an actual crime:
- The first option is to start with a coffee plant/seedling (which can be purchase at most garden stores in spring) and care for it until it flowers and fruits … giving you fresh coffee cherries! (But be prepared to care for it for 5-7 years before this happens).
- The second option is to visit a coffee farm, buy seeds directly from a farmer, and smuggle them home. I don’t recommend this solution, but perhaps with great risk comes great reward? You decide.
You might also try visiting a local garden center or greenhouse that has fruiting coffee trees; However, the chances of locating it and catching it when its fruits are ripe are quite small.
Ripe Cherries Provide the Best Seeds
A final note on obtaining fresh coffee seeds is that, if possible, you should ensure that the cherries are ripe when being selected for seeds. This is because the seeds inside unripe (green) coffee cherries might not be fully developed. Therefore, it’s best to ensure that the seeds are given a chance to fully develop before being picked. Choose coffee seeds for sprouting from fully ripened cherries (i.e. cherries that are red, orange, or yellow, depending on the variety of coffee).
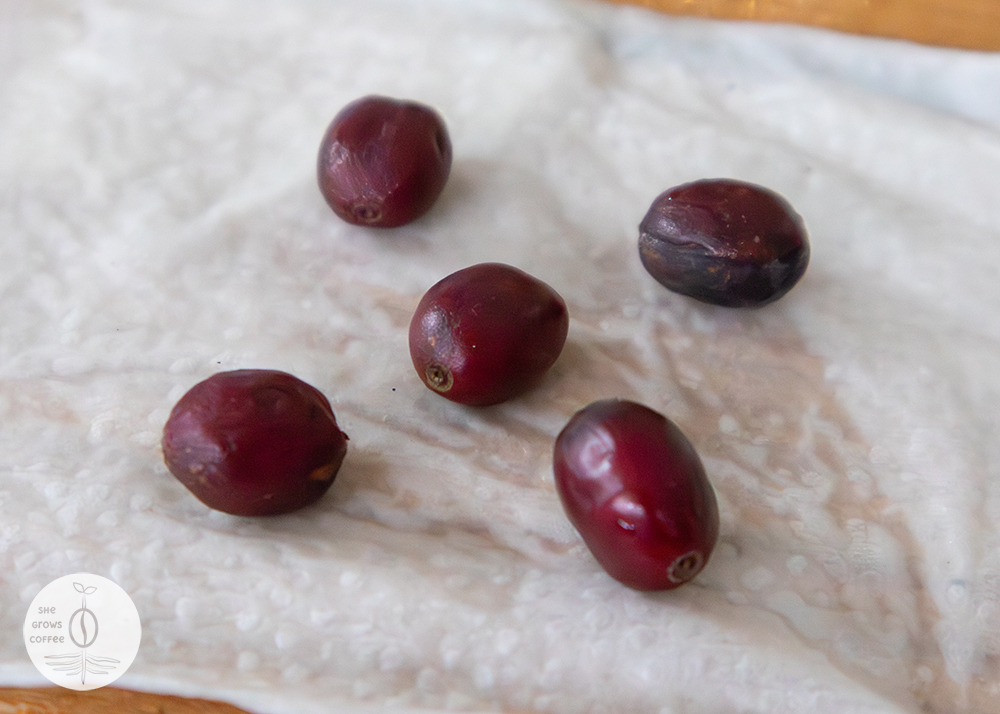
Here are my fresh coffee cherries and seeds from Mexico:
Preparing to Sprout Coffee Seeds
Once you have your fresh coffee cherries or seeds and you’re ready to sprout them, it’s time to gather the needed materials.
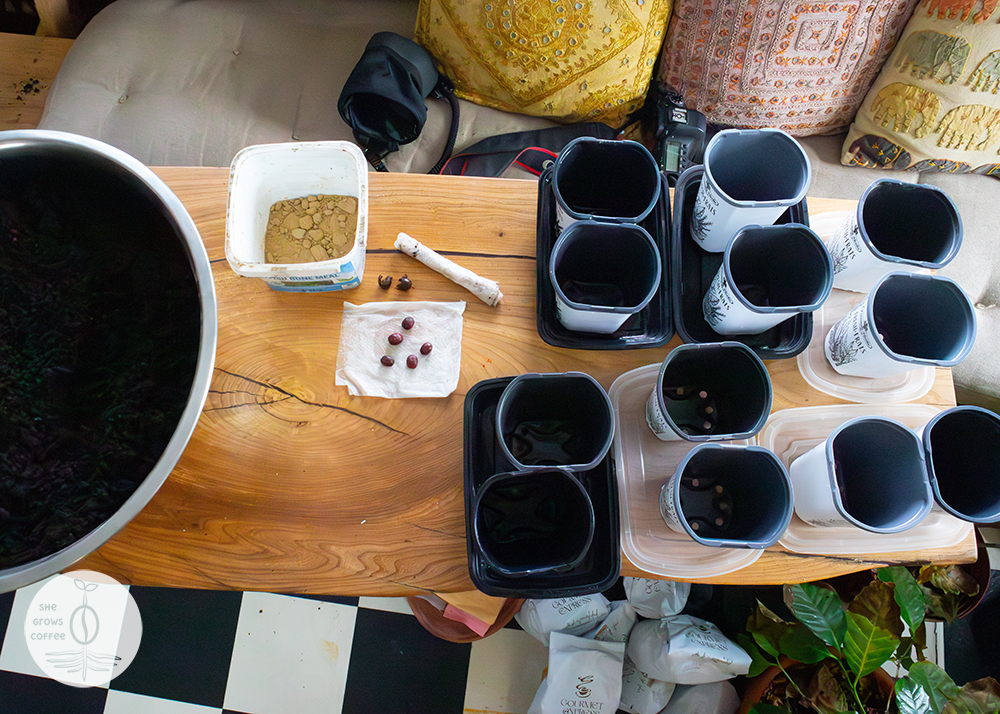
Things You’ll Need:
- Empty Containers
Tip: Taller/deeper pots, like the ones in the pictures below, are better for directing root growth downwards. Coffee grows a taproot so don’t choose wider, shallower pots. Also, choose small containers for seed starting. The containers I like to use measure 3.5-4″ across and 5″ deep. I also suggest using plastic containers (as opposed to clay, for example) because plastic keeps in the moisture better and makes it easier to control. - Catch trays for underneath the containers
- Potting Soil
- Water
- Spray Bottle or “Mister”
- Plastic re-closable bags or clear plastic lids
- Grow Light(s)
- Your precious time & care
Optional:
- Organic Soil Amendments
- Gloves
Sprouting Coffee Seeds in 10 Simple Steps (with Tips!):
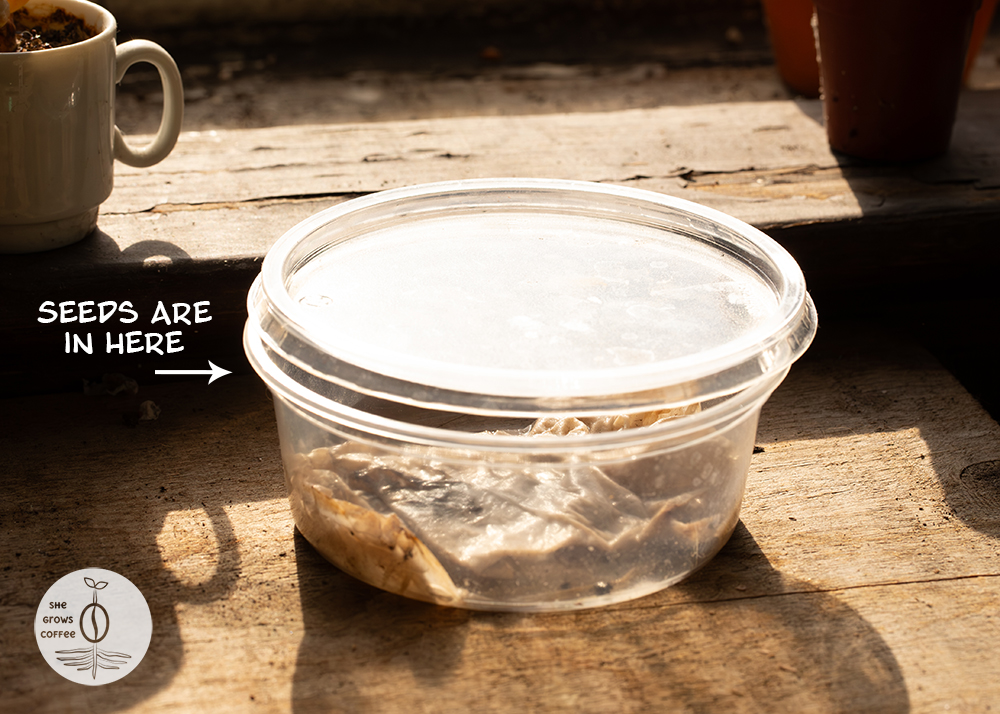
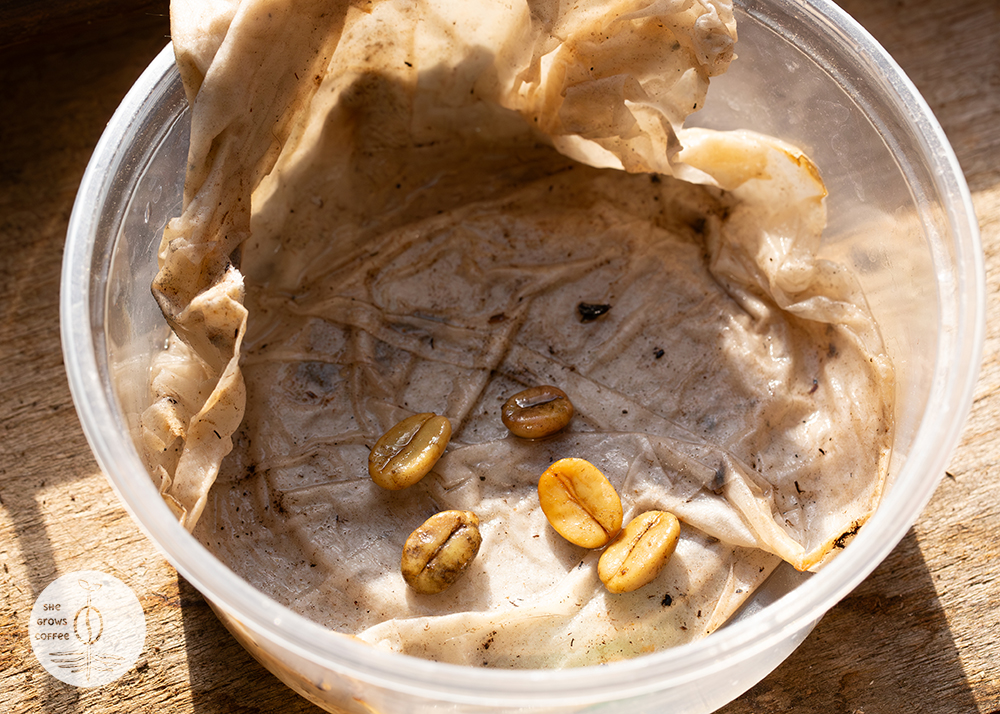
#1 Keep the coffee cherries/seeds moist, not letting them dry out at all if possible. First things first, aim to sprout your fresh seeds as soon as possible after obtaining them so that they are the most fertile. And before you get started, as you may be storing the seeds for some period of time, it’s important to ensure your fresh seeds stay fresh. Treat them like newborn babies and give them all your care and attention. Keep them moist, but don’t let them rot. Storing them between a damp paper towel, and storing that damp paper towel in a container that keeps in some of the moisture, while allowing for some airflow works well (see my plastic container below). Submerging the seeds in water is OK for some hours, and can be done right before planting; However, too many hours being fully submerged in water runs the risk of drowning the seed. I’m not 100% sure if the seed can actually drown, but I would suggest not risking it, especially since it’s not always easy to obtain them in the first place and these conditions don’t occur in nature. You can keep the cherries/seeds moist and un-planted like this until they start to sprout in the paper tower if wanted, but once they start to sprout they need to be planted in moist soil.
#2 Prepare and pre-moisten your potting soil with water. Mix your soil, and organic soil amendments (i.e. compost, mineral mixes, seaweed meal, etc.) if you have them, and pre-moisten the soil with water. Adding organic soil amendments is not necessary, but since coffee plants enjoy high fertility soils, it’s a good idea to mix some in if you have them. No worries if you don’t, because you can always fertilize the plant later on. Pre-moistening the soil with water is an absolute MUST. Always keep in mind that in order for coffee seeds to sprout properly they need consistent moisture and some airflow.
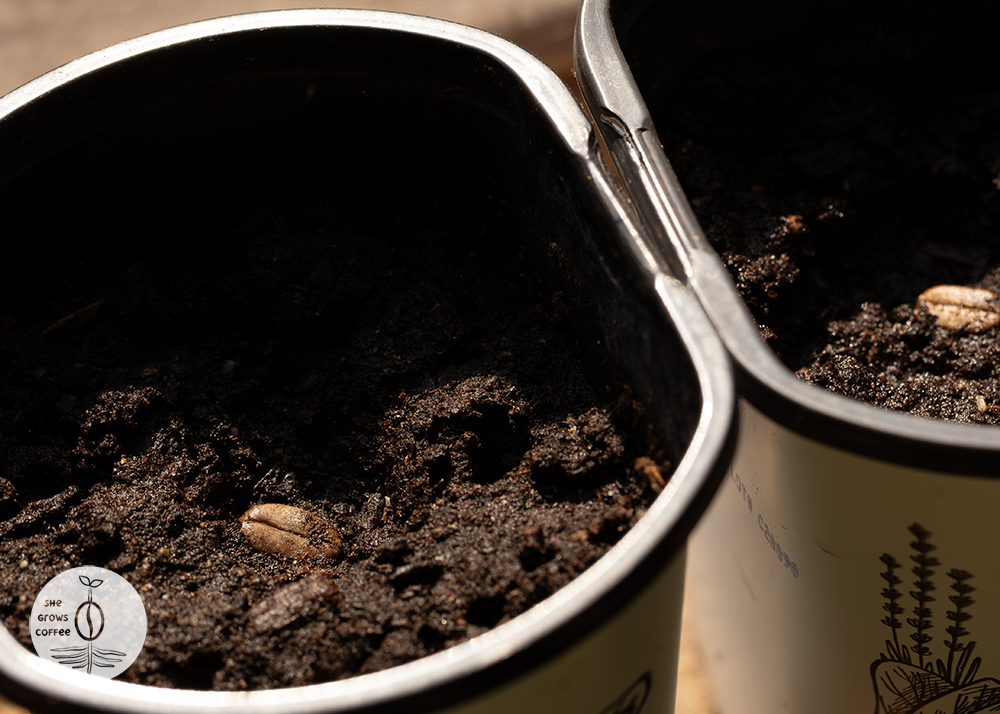
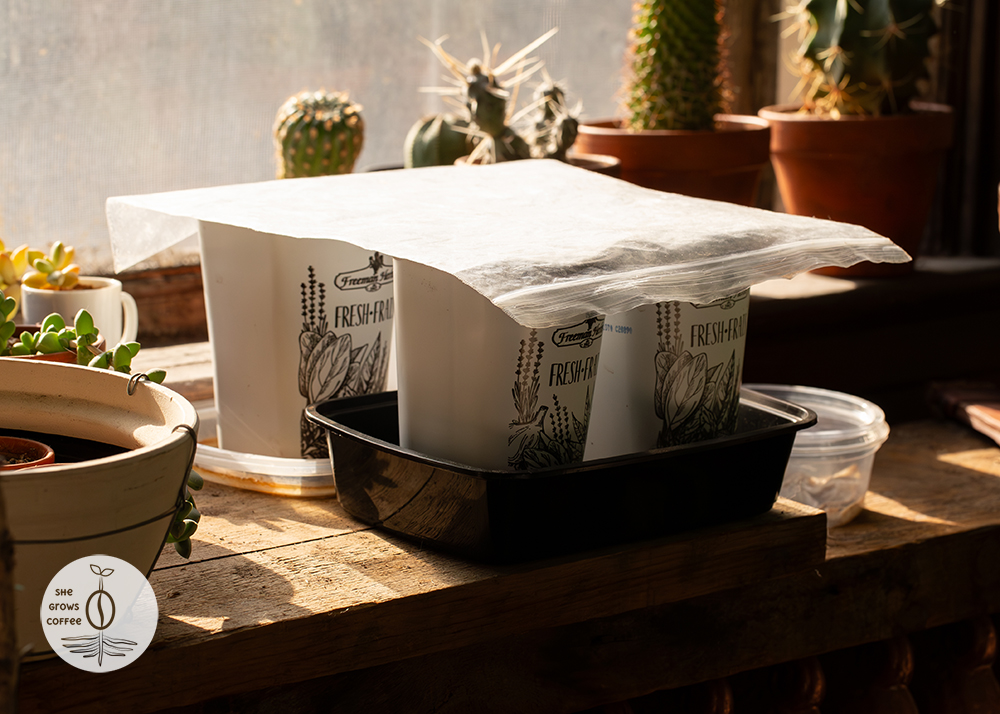
#3 Prepare your pots by pre-filling each with the pre-moistened soil. Leave about an inch of space at the top of each container.
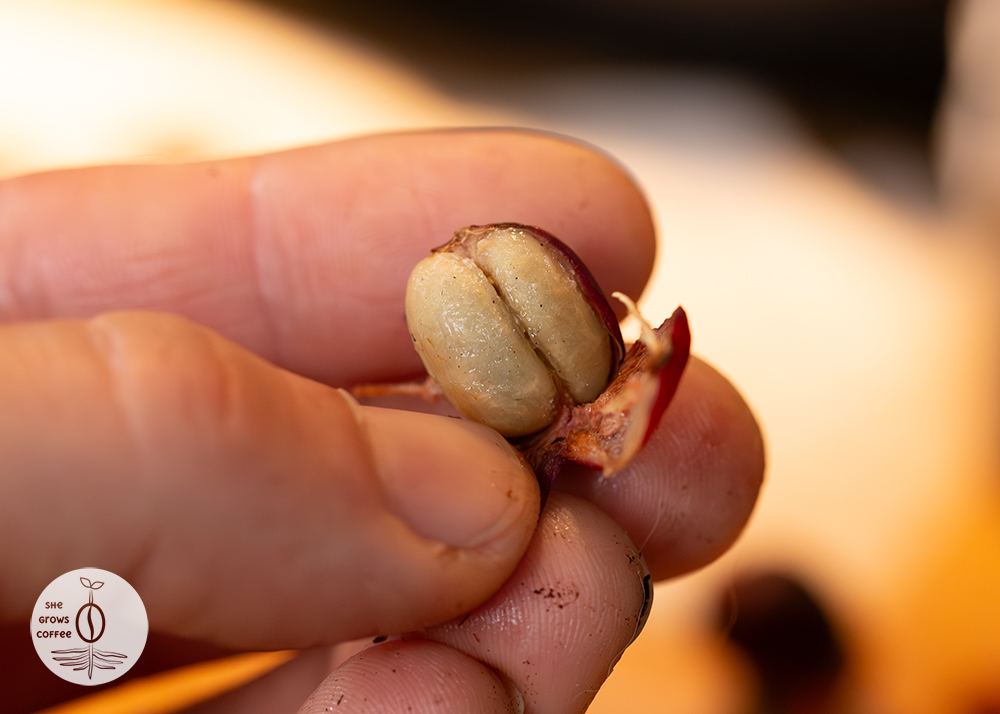
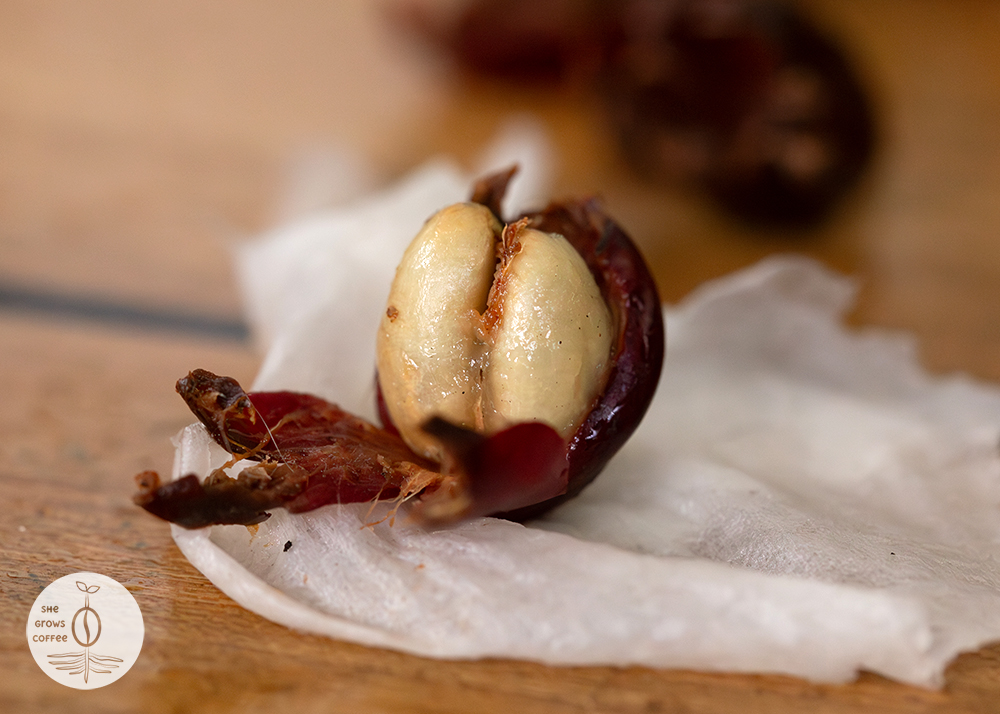
#4 Remove the seeds from the cherry, and from the parchment—or don’t (the choice is yours). If you are starting with fresh cherries or seeds, they will still have their cherry and outer parchment layer intact, both of which can either be removed before sprouting or left on. Coffee farmers in producing regions typically remove the cherry and leave the parchment on. What I have found from my experience sprouting these seeds in Canada, is that you can do it all! I have sprouted seeds from directly planting the whole cherry with success. I have also found success removing the cherry, and both leaving the parchment layer on the seed AND taking it off. What I have observed so far, is that removing the cherry and parchment layer from the seeds caused them to sprout the fastest and may be the easiest method. Why? I’m not sure, but if you think about it the coffee seed needs: 1. Consistent moisture (humidity) to sprout, and 2. To build up enough energy to break through the parchment and cherry. These take time and ideal conditions, and it can be really tricky to provide consistent moisture without risk of rotting. So if the cherry/parchment dries out a bit, then moistens, then dries a bit, then moistens, it can take longer for the seed growth to develop properly and for the tap root to break through these barriers. In the end, I suggest trying all methods to learn which works best for your conditions. I do this because I like to test all the options and learn as I go. But I always think about how the most natural process is for a cherry to fall from a tree and sprout from the soil just like that—Mother Nature’s way.

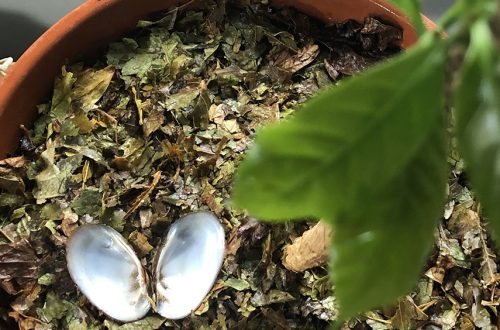
#5 Plant the cherry/seeds. Make a small indent in the top of the soil and place one seed inside that indent in each container. Yes, you can plant more that one seed in each container; However, since each sprouted seed will grow into one coffee tree, I like to give them their own container right away, instead of needing to separate them later. And since I start with fresh seeds, the chances that most of them will sprout are pretty good. Once the cherries/seeds are placed inside the indent of the soil, you can choose to either loosely cover them with a bit of soil or simply press them down a bit and leave them partially uncovered so you can see and monitor them. Personally, I prefer to leave them uncovered because I like to observe and know when they are sprouting. This also helps ensure they don’t rot from too much moisture and not enough airflow. (In the past, I’ve spent weeks watering covered seeds only to dig them up later to find that they had rotted).
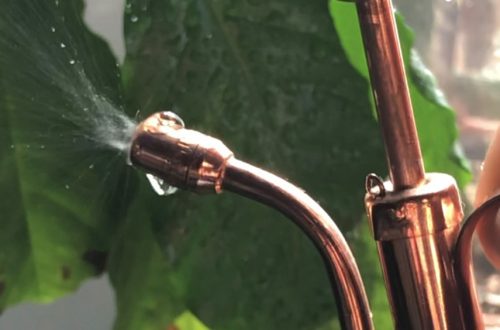
#6 Water the seeds and cover them to maintain humidity. Once planted, pour a little water on the seeds and through the soil, and then cover them in a way that maintains the moisture but also allows for some airflow. I like to use clear plastic for this purpose, and I find it easiest to simply lay a plastic re-closable bag over the containers, or use clear plastic lids if you can find some. Do not leave excess water in the catch trays below the containers. If water collects in the trays, dump it out. Sunlight is optional. The seeds don’t need sunlight to sprout; However, I still use clear plastic to allow some natural light in. I opt to use re-closable bags to cover the seeds, simply because I have them around already and when I lay them over the containers I can cover four of them with one bag. To maintain airflow, I sometimes lay down chopsticks over the containers first, laying the clear re-closable bags on top of those to create a small gap for air to flow through.
#7 Keep your sprouting seeds in a place with ideal temperatures. It is critically important to keep the germinating seeds moist and happy at this point. Coffee seeds need warmer temperatures between (it is suggested between 65-77°F) in order to sprout, and the more consistent the temperature is, the better. I like to store my seeds above a heater so they are warmed from the bottom at night and by a window so they get some natural light to keep them warm during the day. There are seed-sprouting heat mats available—which I don’t find that I need—but you might want to consider if the environment is particularly cool. Definitely keep the seeds away from any cool drafts.
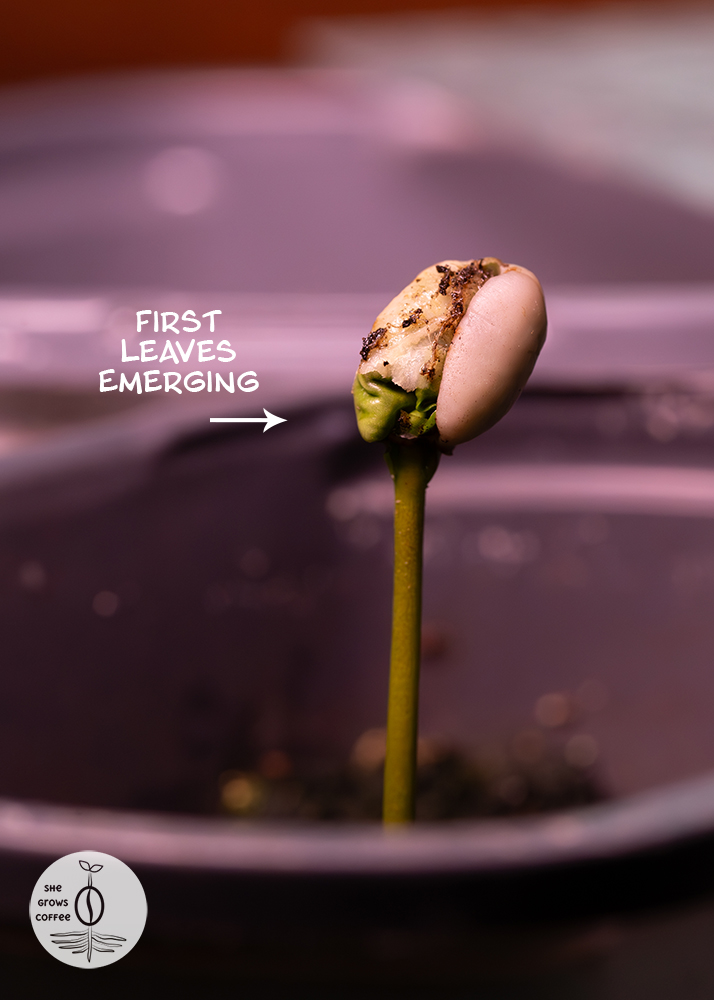
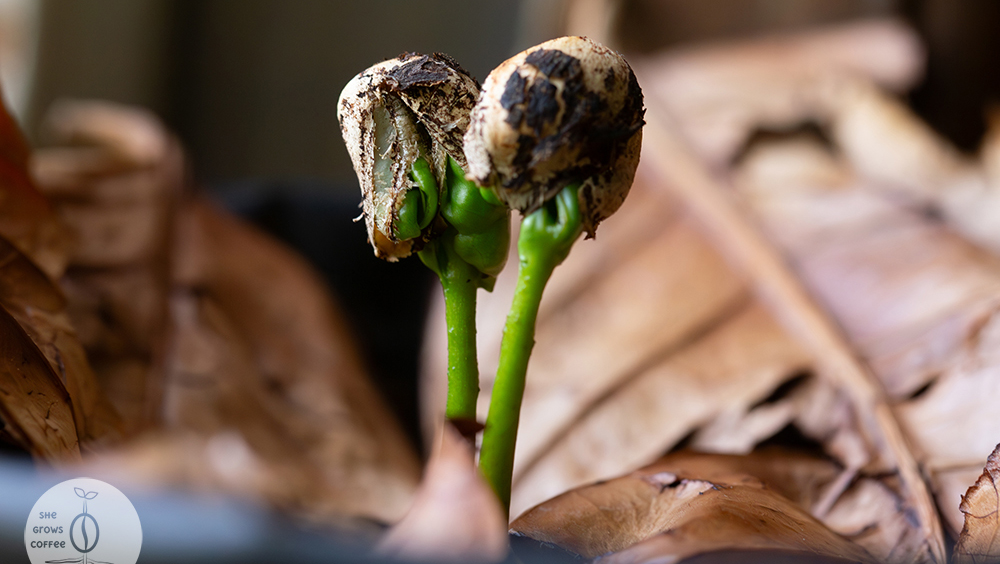
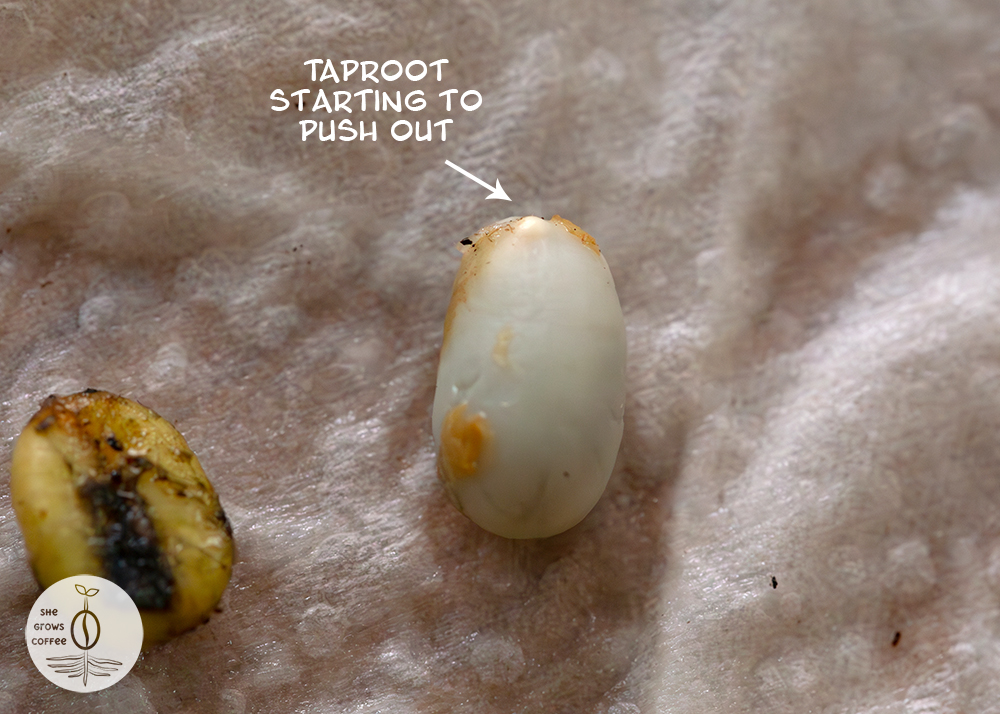
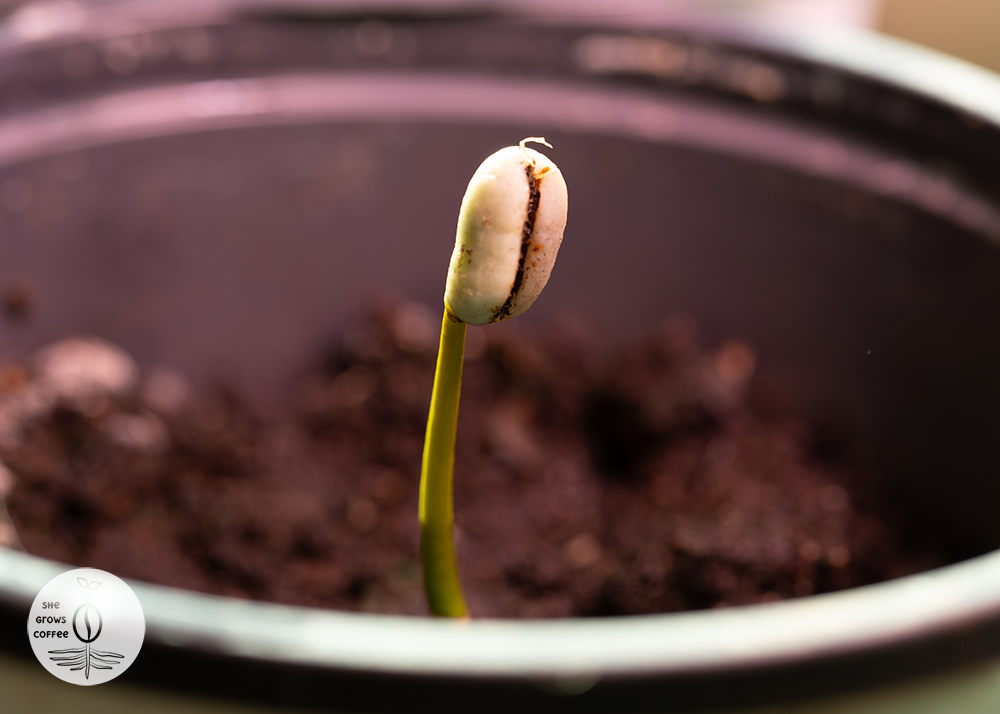
#8 Wait, watch closely, and water often. Once planted and placed in an ideal setting, all that’s left to do is maintain the moisture, airflow, and temperatures until a tap root pops out of on end of the seed. Fresh coffee cherries/seeds can take anywhere from one week to over a month to sprout, so prepare to be patient. Check on them regularly throughout each day (I check mine 4-5 times a day), providing more water and covering/uncovering the seeds as needed, based on the conditions. Again, you’re aiming to maintain moisture, but also allow for some airflow. A spray bottle can be used to mist the top of the soil, but be sure to also water the soil deeply so it doesn’t dry out near the bottom. After one week to 1-2 months, you’ll notice the tap root emerge first and head down into the soil, followed by the coffee seed growing upwards on top of the sprout, which starts yellow and then turns green with sunlight.
#9 Once sprouted, add grow lights. At this point, you have successfully sprouted coffee seeds! But not the trick is to keep them alive. UV light is critical for photosynthesis and the more light brand new coffee seedlings get, the stronger and better they will grow. UV light from grow lights is great because it’s not too harsh, so it won’t harm the delicate seedlings. Position the light(s) a few inches away from the sprouting seed(s). Direct sunlight can be harsh on young seedlings and arabica coffee prefers shade conditions with filtered sunlight (not direct) so I highly recommend UV lights over direct sunlight. If you have super good and filtered natural light, you may not need grow lights; However, I would still recommend using them to make the seedlings as strong as possible, giving them the best possible start at life.
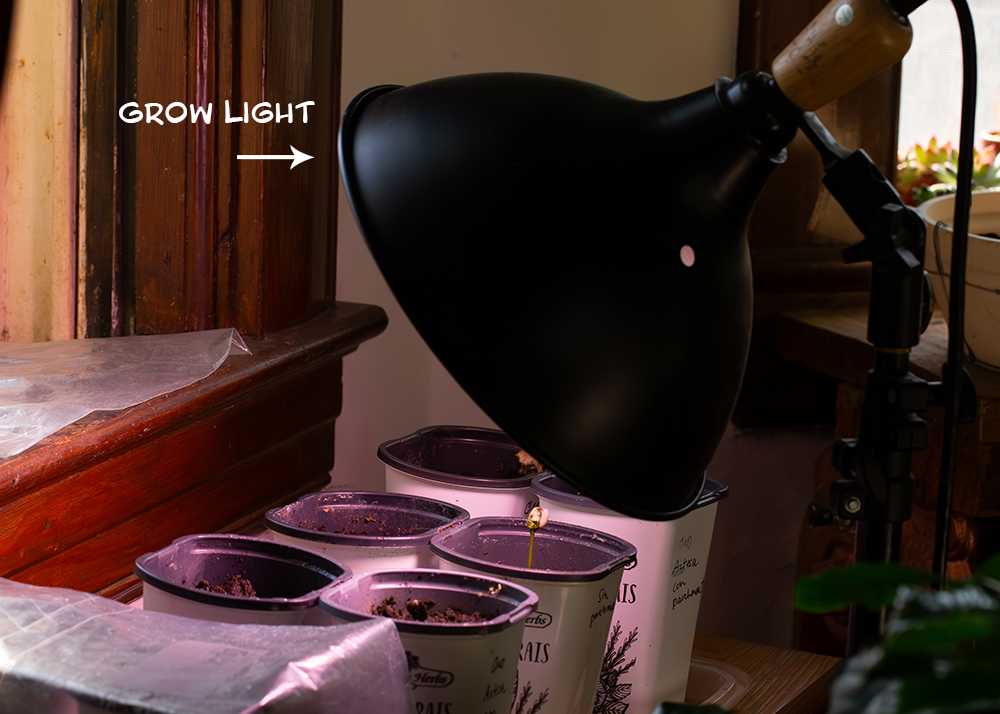
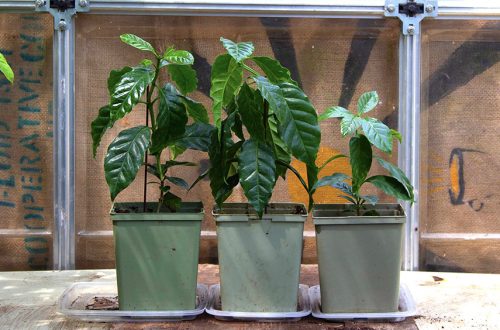
#10 Maintain moisture and sunlight conditions while watching the coffee plant grow! This is the last step. By now, your seedling is sprouted, and it simply needs more of those consistent and ideal conditions to grow strong enough. Remove the plastic covering once the seedling outgrows it. Start misting the coffee seedling a few times per day to maintain humidity. Water the soil as needed, keeping it moist but also allowing for airflow. Move the grow light up as the seedlings grow, maintaining a few inches of distance between the light and the baby plants. Eventually, the sprouted coffee seed will shed its seed head and the first set of coffee leaves will emerge. Congratulations! You are successfully growing a coffee plant from seed. Keep a close eye on maintaining these conditions for the next few weeks. After the first few sets of leaves have formed, and the plant is anywhere from about 3-9 inches tall, the plant will begin to require less daily attention. It will be safe to remove the grow light and just rely on natural light (if wanted, you don’t have to) and now it’s time to follow these instructions for providing ideal coffee tree care.